What DORI Actually Means for Cameras
July 5, 2026 · 4 min read · SiteOps Command
Every camera datasheet leads with a resolution — 4MP, 8MP, 4K. Almost none tell you the thing that actually decides the install: at the far end of the yard, will you be able to identify the person, or only tell that someone is there? That gap has a standard, and the standard is DORI.
The four tiers, in pixels per metre
DORI comes from IEC 62676-4. It defines four operational tiers as a pixel density on the target, measured in pixels per metre (px/m) at the target’s distance — not at the camera. More distance, or a wider lens, means fewer pixels land on the person, and the tier drops.
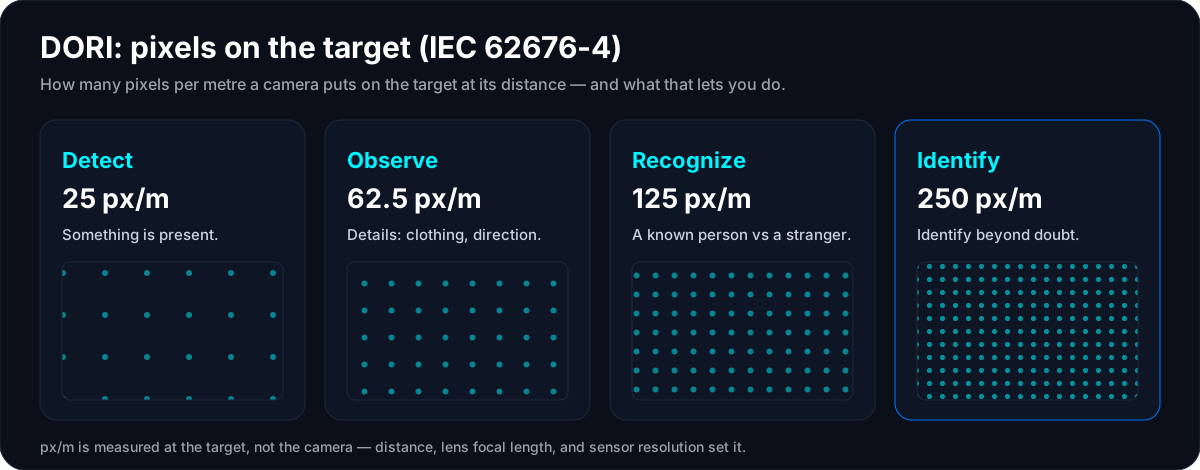
- Detect — 25 px/m. You can tell something is there: a person or vehicle is present in the scene. Enough for a tripwire or general awareness, not for describing anyone.
- Observe — 62.5 px/m. Characteristic details — clothing, behaviour, direction of travel. Good for watching flow through a space.
- Recognize — 125 px/m. You can tell whether the person is someone already known to you — a badged employee versus a stranger.
- Identify — 250 px/m. Identification beyond reasonable doubt: the frame an investigation or a court can actually use.
The tiers are cumulative and the jumps are large. Getting from Recognize to Identify doubles the pixels you need on the same target — which usually means a tighter lens, a closer mount, or a higher-resolution sensor.
Why one PPF number quietly fails
Plenty of designs compute a single pixels-per-foot figure for the whole site and move on. The problem is that a loading dock, where you need to identify a face, and a back corridor, where you only need to detect motion, are a factor of ten apart in required density — 250 versus 25 px/m.
A single global number does one of two things, and both cost you:
- It under-covers the zones that matter. The dock gets designed to a comfortable average and lands at Observe when you needed Identify. The footage exists; it cannot answer the one question you bought the camera to answer.
- It over-specs the zones that do not. Every hallway camera sized for identification inflates camera count, licences, storage, and switch ports — budget spent where a quarter of the density would have done.
The number that looks safe on the quote is often the one that fails the audit.
What honest DORI looks like
The fix is to score px/m per zone, against the tier that zone actually needs. In practice that means four things working together:
- Zone goals, not a global figure. Each area carries its DORI target from its purpose — entries and cash handling at Identify, aisles at Recognize, the perimeter at Detect.
- Pixels on target from the real lens. Focal length and sensor resolution become px/m. A fisheye or panoramic lens is modelled by its actual projection, not a straight-line wedge that stops being true a few degrees off-axis.
- Coverage that respects the building. Walls, glass, and warehouse racking cast shadows. A camera’s field of view is what survives that occlusion — not the cone drawn on a flat plan. (More on that in PPF is the floor, not the ceiling.)
- Night as a first-class case. Infrared reach comes from the datasheet beam specification, so the camera that reads at noon and goes dark at 2 a.m. is caught at design time, not on the first incident.
This is where the discipline matters: the physics owns the number. SiteOps Command never invents a pixel density — it computes px/m from the lens, the sensor, the distance, and the obstacles, and shows it back to you as a heatmap per zone. See the method on the coverage physics page.
How to apply it on your next design
- Write the DORI tier into each zone before you place a camera. Decide what the area is for first.
- Reserve Identify (250 px/m) for the few places that truly need it — entries, tills, evidence-grade areas. It is expensive; spend it deliberately.
- Check px/m at the far edge of each zone, not the near edge. The worst case is the target at maximum distance.
- Model fisheye and multi-sensor cameras by their projection, and verify the corners, where distortion is highest.
- Verify night coverage on its own terms — infrared range, not lux marketing.
- Hand the customer a per-camera view they can stand under and confirm.
DORI turns “we have cameras there” into “we can identify a face at the dock and recognise a badge in the aisle” — a claim you can put on paper and defend. If you are sizing coverage against a single PPF number today, see how per-zone DORI changes the design on the camera design comparison and the security & low-voltage page. To pressure-test it on your own floor plan, book a demo.
Frequently asked
- What does DORI stand for?
- Detect, Observe, Recognize, and Identify — the four operational tiers defined in IEC 62676-4 for video surveillance, expressed as pixel density on the target in pixels per metre (px/m).
- What are the DORI pixel densities?
- Detect is 25 px/m, Observe is 62.5 px/m, Recognize is 125 px/m, and Identify is 250 px/m. Each is measured at the target's distance from the camera, not at the camera.
- Is DORI the same as pixels-per-foot (PPF)?
- They measure the same idea — pixel density on the target — in different units. DORI adds the operational tiers and is applied per zone. A single site-wide PPF number ignores that different areas need very different densities.
- How many pixels do you need to identify a face?
- IEC 62676-4 puts identification at 250 px/m on the target. Whether a camera reaches it depends on the target's distance, the lens focal length, and the sensor resolution — not the headline megapixel count alone.